Key Takeaways: A whole home remodel in San Diego is a 6-12 month journey, not a sprint. The design and permit phase is often the longest, unpredictable part. Your timeline is dictated by three things: scope, city planning department speed, and material lead times. Rushing the planning stage guarantees delays later.
Let’s be honest, the first question everyone asks when they’re thinking about a whole home remodel isn’t about tile or cabinet finishes. It’s, “How long is this going to take?” And if you’re in San Diego, you’ve probably heard the horror stories—the friend-of-a-friend whose kitchen reno took a year, the neighbor who battled the city for permits for months. The anxiety is real because you’re not just planning a project; you’re planning a significant disruption to your life.
We’ve been through this process dozens of times with families from La Jolla to North Park. The timeline isn’t a mystery, but it is a complex dance. It depends entirely on what you’re doing (are we talking a down-to-the-studs reconfiguration or a cosmetic update?), how prepared you are with decisions, and the ever-present wildcard: the City of San Diego’s Development Services Department. Coastal Commission approvals in places like Point Loma or Ocean Beach add another layer entirely.
So, here’s a realistic, month-by-month guide from pre-design to final walkthrough, grounded in the realities of building in America’s Finest City. This isn’t a best-case scenario; it’s the honest framework we work from, complete with the built-in buffers we know we’ll need.
Table of Contents
What Determines Your Remodel Timeline?
Before we get into the months, you need to understand the three core drivers of your schedule. Think of these as the forces of nature for a San Diego remodel.
Scope and Complexity. This is the big one. A whole-home remodel that reconfigures the floorplan, moves plumbing walls, and adds square footage is a different beast than updating finishes in the existing footprint. Structural engineering, soil reports for hillside homes, and integrating new systems (like whole-home solar or smart tech) add significant chunks of time.
The Permit Process. This is the single greatest variable. The time from submitting your plans to getting your first inspection card can range from a few weeks for a simple overlay to six months or more for a complex addition in a busy planning district. It’s a queue, and everyone’s in line. We’ll dive deeper into this later.
Material Selection and Lead Times. The supply chain is better than it was a few years ago, but it’s not 2019. Custom windows, specialty doors, and certain appliances can still have lead times of 12-16 weeks. If you haven’t selected your tile by the time demo starts, you will cause a delay. The rule is simple: Long-lead items must be ordered during the permit phase.
The Realistic Month-by-Month Roadmap
Here’s the phased approach. Remember, these phases often overlap, and delays in one ripple through the rest. We always build in a contingency buffer of 15-20% on our timeline estimates for the unknowns.
Phase 1: Discovery & Design (Months 1-3)
This is where the foundation of your entire project is laid—figuratively. Rushing this is the most common and costly mistake homeowners make.
Month 1: The Deep Dive. We’re not just talking about your Pinterest board. This is about understanding how you live. How does light move through your San Diego home? Where does the family congregate? What are your non-negotiables? We’ll also bring in an architect or designer to start translating those needs into preliminary sketches. Simultaneously, we’re doing a thorough feasibility study. That cute idea for a pop-top addition? We need to check your property’s zoning setbacks and any CC&Rs from your HOA.
Month 2: Schematic Design & Budget Alignment. Those preliminary sketches get refined into floor plans and elevations. This is also when reality often sets in. The design you love might be 30% over your desired budget. This is the critical moment to make value-engineering decisions on paper—changing materials, scaling back a secondary bathroom, etc.—not when the walls are open. It’s painful but necessary.
Month 3: Construction Documents & Pre-Submittal. Once the design and budget are locked, the architect produces the detailed construction drawings and engineering plans required for permit submittal. Meanwhile, we’re finalizing the project specifications—the exact model of every faucet, tile, and light fixture. This document package is what goes to the city and what the construction team will build from. Any vagueness here leads to change orders and delays later.
The Great Permit Wait (Months 3-6+)
You’ve submitted your beautiful, complete plan set to the DSD. Now, you wait. The city will route your plans through Planning, Engineering, Fire, and other departments. You will get comments back—a request for clarification, a required correction, a note about drainage calculations. This is normal.
Each round of “plan check” can take 4-8 weeks. A complex project might go through 2-3 rounds. This is the phase that tries everyone’s patience. There’s no way to rush it, but an experienced team knows how to navigate the process efficiently, responding to comments thoroughly to avoid unnecessary back-and-forth. This is also when we place orders for those long-lead items, so they’re ready when construction starts.
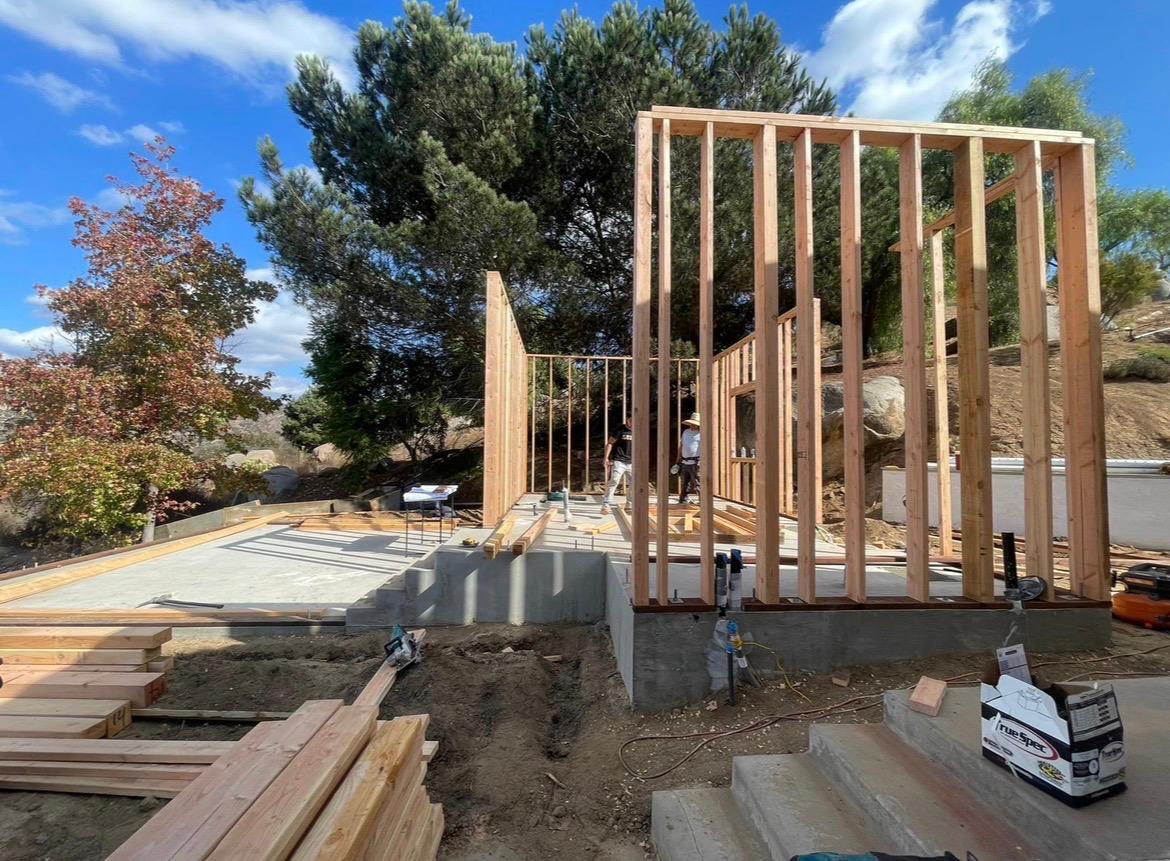
Phase 2: Construction Begins (Months 6-12+)
Finally, the hammer swings. The sequence below is standard, but weather (yes, even in San Diego, rain can delay framing inspections), unexpected conditions found in the walls, or inspection scheduling can shift things.
Months 6-7: Demolition & Rough Work. This is the messy part. After demo, the “rough” trades come in: framers, plumbers, electricians, and HVAC. All the infrastructure goes inside the walls and floors. This stage culminates in a series of critical city inspections (framing, electrical, plumbing rough-ins). Nothing gets covered up until these inspections are signed off.
Months 8-9: Closing Up & Exteriors. Insulation and drywall go up—suddenly, it starts to look like rooms again. Exterior work like stucco, roofing, and window installation happens. This phase is satisfying because progress is visible daily.
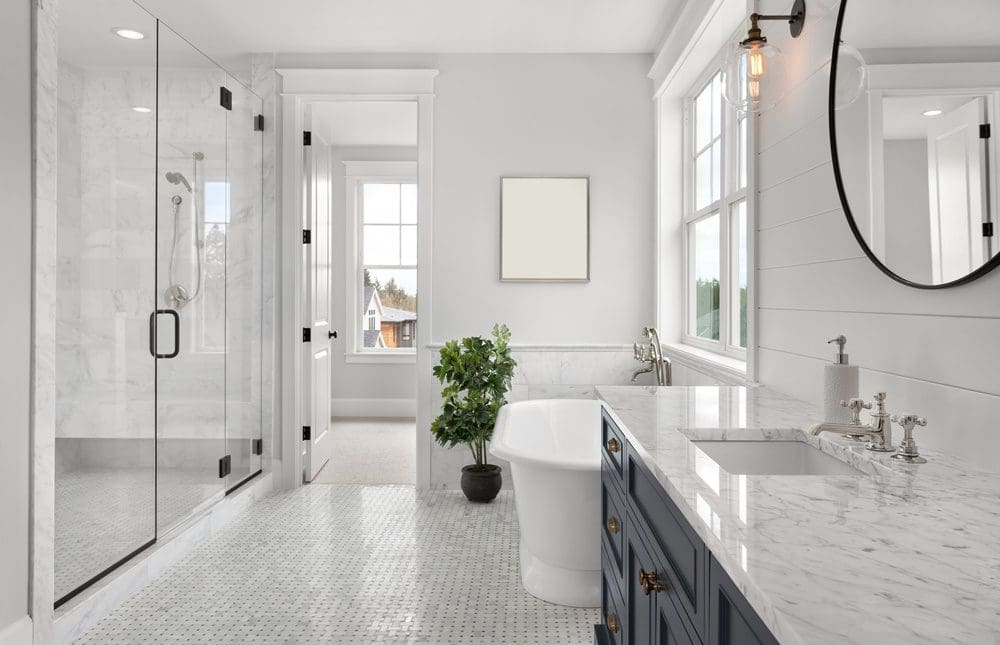
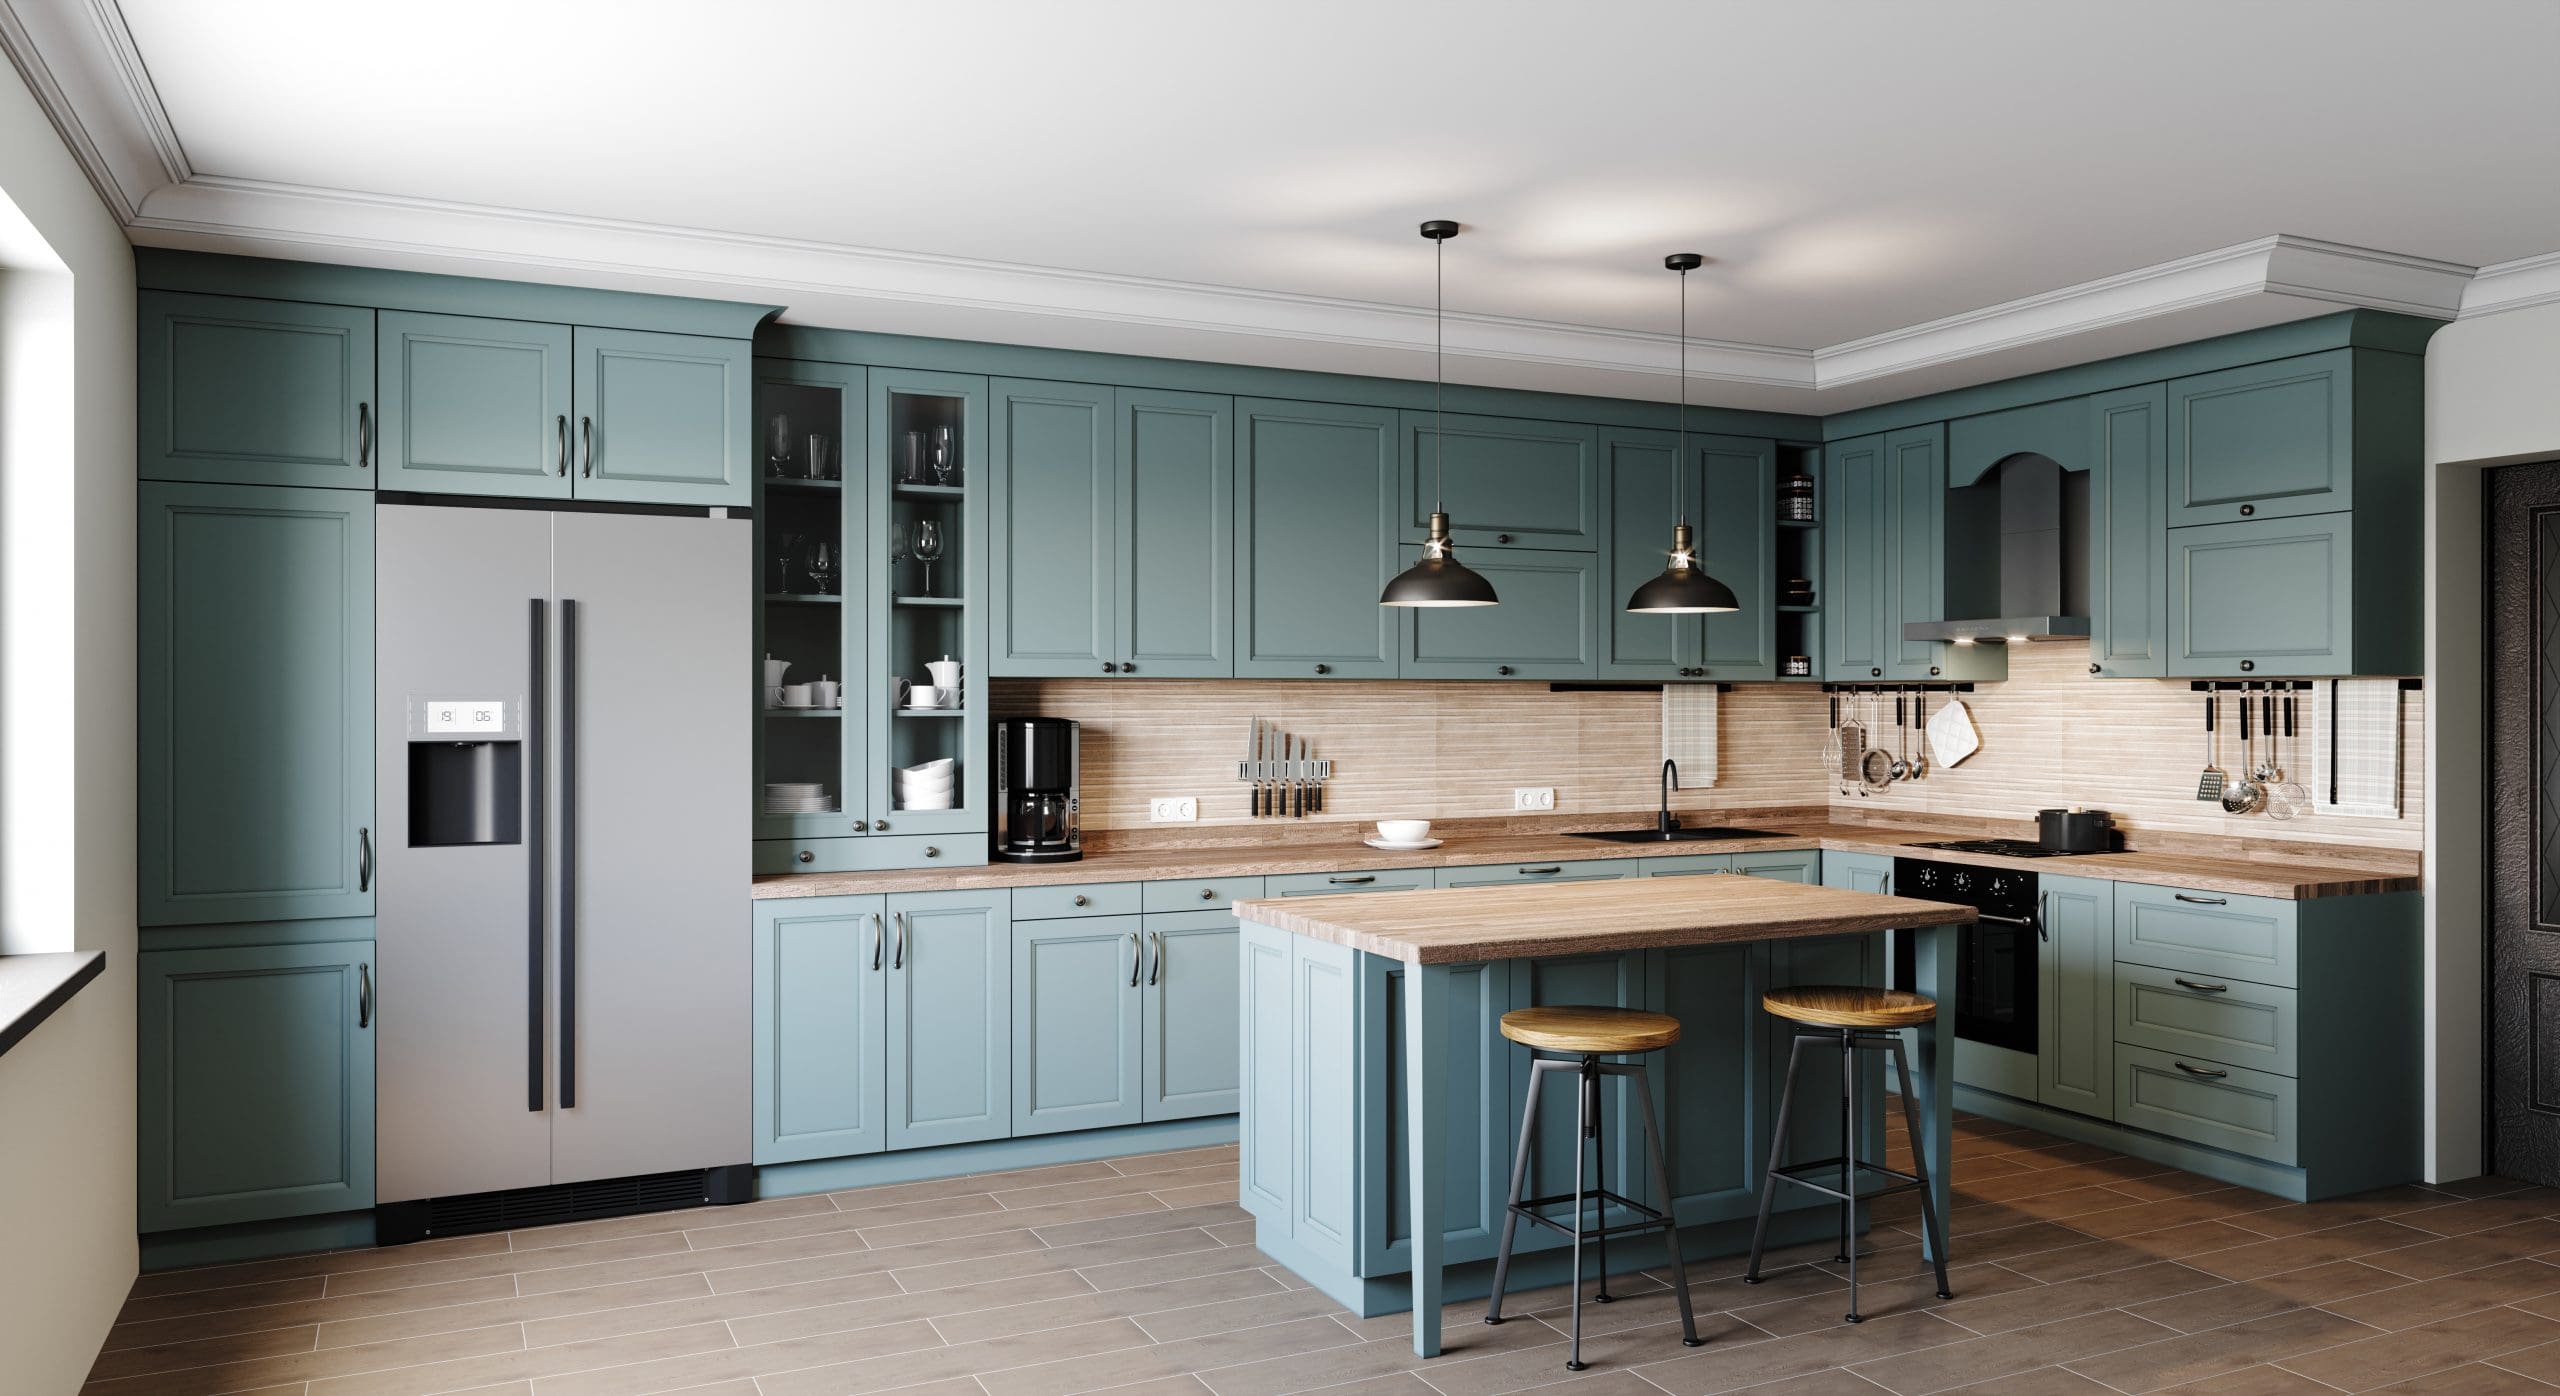
Months 10-11: Interiors & Finishes. This is the detail-oriented stage: painting, cabinetry installation, flooring, tile work, and trim. It feels slower because each task is highly specialized. Coordination is key—the floor guy can’t work while the painters are there, and the countertop template can’t be made until the cabinets are perfectly level and installed.
Month 12: The Final Push & Walkthrough. The last 10% takes what feels like 30% of the effort. All the final touches are installed: light fixtures, plumbing trim, hardware, appliances. We conduct a meticulous pre-inspection, then call for the city’s final sign-off. Once we have that certificate of occupancy (for additions) or final sign-off, we do our final walkthrough with you, creating a “punch list” of any minor items to correct before project closeout.
The Hidden Time Sinks (And How to Mitigate Them)
Every project has them. Knowing where they lurk helps you plan.
- The “While-We’re-At-It” Syndrome: This is the biggest schedule killer. Once walls are open, it’s tempting to add new electrical outlets, move a pipe, or upgrade wiring. These changes require revised drawings, possible permit amendments, and re-sequencing trades. Have a contingency budget, but fight the urge for scope creep.
- Indecision: Your contractor needs decisions to keep the trades moving. If you haven’t picked your bathroom vanity by the time the plumber is scheduled, he’ll have to move on to another job, and you’ll wait for his next opening.
- Unforeseen Conditions: In older San Diego neighborhoods like South Park or Normal Heights, we often find knob-and-tube wiring, outdated plumbing, or structural surprises. A good pre-construction investigation helps, but a contingency fund (and timeline buffer) is essential for the truly hidden issues.
When Professional Management Isn’t Just Helpful—It’s Critical
For a whole-home remodel, acting as your own general contractor is a monumental task. You become the full-time project manager, scheduler, and quality control inspector for 6-12 months. The value a design-build firm brings isn’t just in swinging hammers; it’s in orchestrating the symphony of trades, permits, and deliveries.
We have established relationships with the best framers, electricians, and tile setters in the county. We know how to get an inspector out on a timely basis. We have the systems to track the 500+ individual tasks that make up your project. For most homeowners, the stress and time savings of hiring a professional team far outweigh the potential cost savings of DIY management. One misstep in scheduling or a failed inspection can cost weeks and thousands of dollars.
Budgeting Your Time and Money: A Practical Table
Let’s break down where your time and money actually go. This table is based on a typical 2,000 sq. ft. whole-home remodel in San Diego with a moderate scope (reconfiguring some walls, updating all systems and finishes).
| Phase | Approx. Time Allocation | Approx. Cost Allocation | Key Homeowner Responsibility |
|---|---|---|---|
| Pre-Design & Design | 10-15% of timeline | 10-15% of budget | Being decisive, providing clear feedback, aligning dreams with budget. |
| Engineering & Permitting | 20-30% of timeline | 5-10% of budget | Patience. Responding quickly to any questions from your team. |
| Construction (Demolition to Close-Up) | 40-50% of timeline | 50-60% of budget | Making final selections before they’re needed, securing any financing. |
| Finishes & Closeout | 15-20% of timeline | 20-25% of budget | Participating in the final walkthrough, planning your move-back. |
Wrapping It Up
A whole home remodel is a marathon with a sprint finish. The timeline we’ve outlined is the realistic framework, but your specific journey will have its own unique rhythm. The difference between a stressful ordeal and a smooth transformation comes down to three things: meticulous planning in the early stages, a team that knows how to navigate San Diego’s specific building landscape, and a healthy respect for the process.
If you’re in the early dreaming stages, start by getting your finances in order and talking to a few reputable firms. The more clarity you have upfront, the smoother your months-long journey from pre-design to final walkthrough will be. And if you’re looking for a team that’s navigated this specific path in San Diego countless times, feel free to reach out to us at Golden Shore Design & Build for a consult. We know the dance, and we’re happy to lead.
People Also Ask
The 30% rule in remodeling is a financial guideline suggesting that homeowners should not spend more than 30% of their home's current market value on a single renovation project. This principle helps protect your investment by ensuring the cost of improvements does not exceed the potential resale value of the home. For example, if your property is worth $500,000, you should limit a major kitchen or bathroom remodel to around $150,000. Following this rule can prevent overcapitalization, where you spend more on a renovation than the added value it brings. For a detailed approach to planning your project, refer to our internal article The Complete Home Renovation Roadmap: A Step‑by‑Step Guide From First Sketch to Final Walkthrough, which outlines key steps from budgeting to final inspection. At Golden Shore Design and Build, we always advise clients to balance personal enjoyment with long-term financial wisdom.
The correct order of renovation typically follows a logical sequence to ensure efficiency and protect finished work. Start with demolition, removing old fixtures, tiles, and flooring. Next, address rough-in work, including plumbing, electrical, and HVAC changes. Then, install insulation and hang drywall. After taping and mudding, prime and paint the walls. Flooring is installed next, followed by cabinetry and countertops. Finally, install fixtures, sinks, faucets, lighting, and trim. For a detailed breakdown, our internal article What To Expect During Your Custom Bathroom Remodel: A Week-by-Week Timeline provides a week-by-week guide. Golden Shore Design and Build recommends this sequence to avoid damage and ensure a seamless finish.
A budget of $300,000 is generally sufficient for a comprehensive home renovation, though the final outcome depends heavily on the scope of work, property size, and material choices. For a standard single-family home, this amount can cover major structural changes, kitchen and bathroom remodels, new flooring, and upgraded systems like HVAC or electrical. However, costs can escalate quickly with high-end finishes, custom cabinetry, or unforeseen structural issues. To ensure your investment is well-managed, we recommend consulting with a professional team like Golden Shore Design and Build. For a detailed breakdown of budgeting and project phases, you can refer to our internal article The Complete Home Renovation Roadmap: A Step‑by‑Step Guide From First Sketch to Final Walkthrough, which provides a step-by-step framework to help you allocate funds effectively and avoid common pitfalls.
For a typical remodel in San Diego, the general order of construction follows a logical sequence to ensure structural integrity and efficiency. It begins with demolition and site preparation, followed by rough framing and any necessary structural reinforcements. Next, rough-in work for plumbing, electrical, and HVAC systems is completed. After inspections, insulation is installed, then drywall. The finishing phase includes flooring, cabinetry, countertops, and trim work. Finally, painting, fixtures, and final touches are completed. For a detailed breakdown tailored to your specific project, we recommend reviewing our internal article FAQ Golden Shore Design & Build — San Diego, which covers all phases. Golden Shore Design and Build follows this industry-standard sequence to deliver quality results.