Ever stare at your house and feel a deep, profound sense of “meh”? We get it. One day you’re blissfully making toast, and the next, you’re side-eyeing your kitchen cabinets like they personally offended you. That nagging feeling is the renovation itch, and once it starts, good luck ignoring it. But between dreaming of a spa-like bathroom and the terrifying reality of permits, dust, and budgets, the whole process can feel overwhelming. Where do we even start?
Well, take a deep breath. We’ve been navigating the wild world of San Diego home remodels for years, and we’re here to talk you through it. No jargon, no pressure—just a friendly chat about turning your “meh” into “wow.”
Table of Contents
The Great San Diego Dilemma: Move or Improve?
Let’s tackle the big question first. In a market like ours, with prices doing their best impression of a SpaceX launch, moving isn’t always the answer. Sometimes, the best investment is the one you’re already living in. A strategic home remodel or room addition can give you the space and function you crave without the hassle of bidding wars and moving trucks.
Think about it: do you really want to leave your perfect neighborhood, your favorite local spot, that one neighbor who actually returns your hedge clippers? IMO, enhancing what you have often wins. This is where a clear-eyed chat about cost versus value comes in. A general contractor worth their salt won’t just talk price; they’ll help you understand the long-term play.
Picking Your Project: From Quick Fixes to Whole-House Adventures
Not every itch requires a full-body scratch. Your project should match your life, your budget, and your sanity threshold.
The Power Players: Kitchen & Bathroom
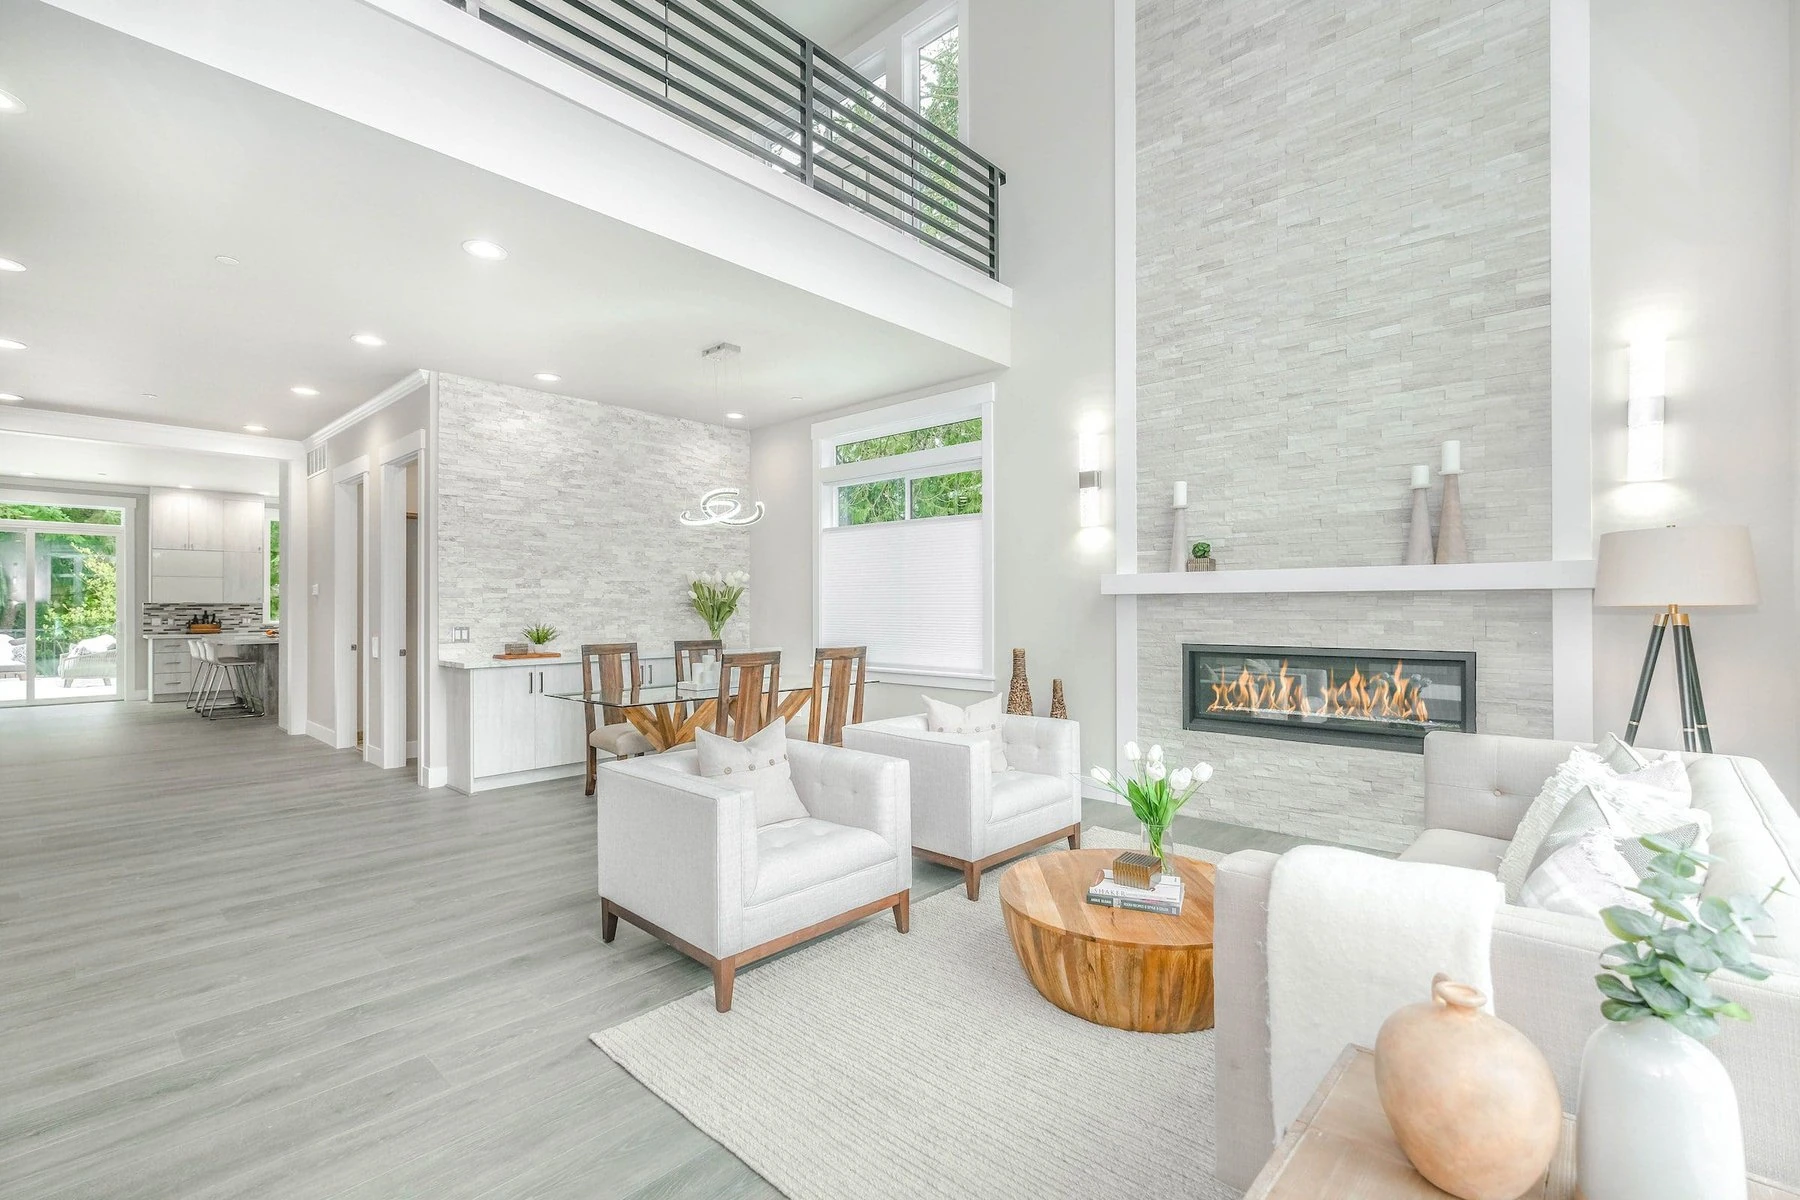
These are the classic for a reason. A kitchen remodel is the heavyweight champ of ROI and daily joy. A bathroom renovation, especially turning a tired one into a retreat, is a close second. They’re disruptive, sure, but the payoff is instant every single morning.
The Space Makers: ADUs & Room Additions
Need a home office, a teen suite, or rental income? An ADU (Accessory Dwelling Unit) is San Diego’s golden ticket. A room addition, on the other hand, seamlessly blends new square footage with your existing layout. Both are brilliant solutions, but they live in different worlds of planning and permits.
The Grand Vision: Whole-House & Luxury Home Building
This is for the folks ready to truly transform their residential footprint. A whole house renovation or working with luxury home builders for a custom build is a marathon, not a sprint. It’s detailed, immersive, and when done right, utterly spectacular.
Why Your “Nearest” Contractor Isn’t Always Your “Best” Contractor
Here’s where we need to get real for a second. A quick search for the “nearest remodeling company” or the “closest general contractor” is tempting. Convenience! But would you choose a heart surgeon based solely on their proximity to your favorite taco shop? Probably not.
The nearby team might be fantastic, or they might be the reason for your future gray hairs. The point is, you need to vet them, not just map them. Look for a remodeling contractor with a portfolio that makes your heart sing, a process that makes sense, and communication that doesn’t feel like pulling teeth. At Golden Shore Design and Build, for example, we believe being your San Diego neighbor means we’re invested in your project’s success for the long haul—we’re not just passing through.
The Magic of Seeing It Before You Build It (Seriously, It’s a Game-Changer)
Remember playing with Legos as a kid? You could see the spaceship come together before you committed. Modern home design has its own version of that, and it’s not a luxury—it’s a necessity. 3D design and visualization tools are the ultimate peace-of-mind purchasers.
Gone are the days of trying to decipher blueprints and hoping the tile “feels” right. Now, we can walk you through a photorealistic version of your new space. You can see the light, the flow, the cabinet finish. It eliminates the “I-thought-it-would-look-different” panic. It’s one of the most powerful parts of our process at Golden Shore Design and Build, because it turns abstract ideas into a shared vision we can all get excited about.
Budget Talk: Let’s Demystify the “Cost” Conversation
Okay, let’s roll up our sleeves. The price question. It’s the big one. Everyone wants a number, but a quality remodeling company can’t shout one from the rooftops. Why? Because without a plan, a number is just a guess, and guesses lead to trouble.
A realistic budget considers:
- Scope & Scale: Are we moving walls or just updating fixtures?
- Material Choices: This is the grand canyon of budgeting. Custom cabinetry and quartzite tell a different financial story than stock cabinets and laminate.
- Labor & Expertise: Skilled craftspeople are worth every penny. They’re the difference between a flip that looks good on Instagram and a home building detail that lasts for decades.
- The “Oh Wow!” Factor: That smart home system or steam shower you suddenly discover you need.
The goal is alignment, not surprise. A detailed proposal should be your bible, not a vague suggestion.
Your San Diego Remodel Roadmap: A Handy Table
Let’s break down a typical project journey. While every home remodel is unique, they generally follow this rhythm:
| Phase | What Happens | Your Key Role | Pro Tip |
|---|---|---|---|
| Discovery & Design | Initial consults, concept development, 3D design, planning. | Dream big! Communicate your wants, needs, and must-haves. | Be brutally honest about your budget. It saves everyone time and heartache. |
| Planning & Permits | Engineering, final drawings, city submissions, HOA approvals. | Provide necessary documents and be patient. San Diego permits have their own… pace. 🙂 | A good team handles this heavy lifting. This is where experience matters. |
| Pre-Construction | Final selections, ordering materials, scheduling, prepping the site. | Make decisions! Tile, paint, hardware—your timely choices keep the train on track. | Order samples. Seeing and touching materials in your home’s light is crucial. |
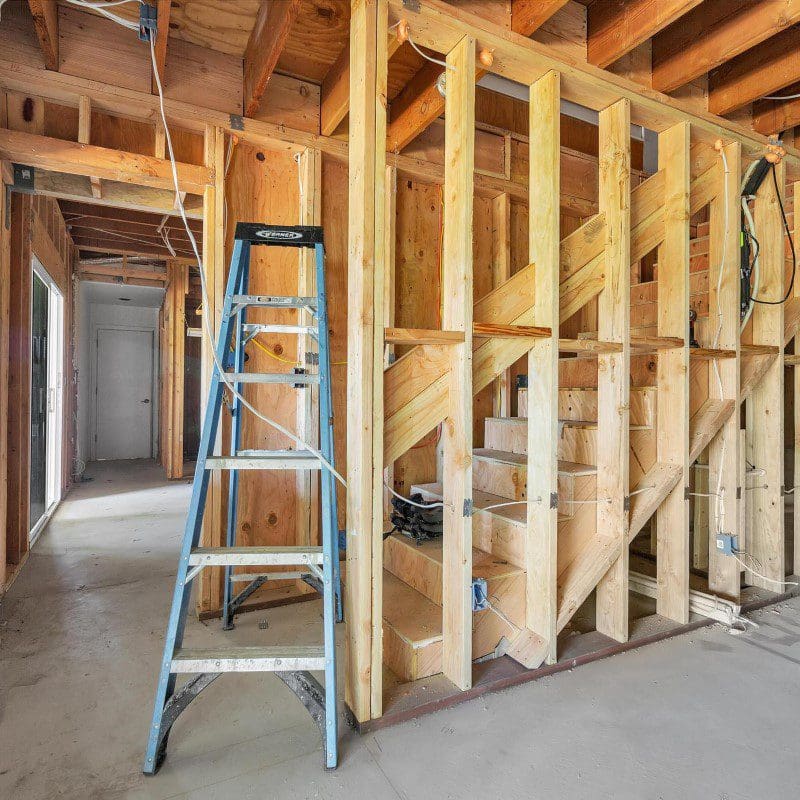
| Construction | The demolition, framing, plumbing, electrical, drywall, finishes—the magic! | Maintain a flexible living situation and open communication with your project lead. | Weekly check-ins are your best friend. No question is too small. |
| Final Walkthrough & Closeout | Punch list review, final cleaning, system tutorials, project handoff. | Do a detailed walkthrough. Test every switch, drawer, and door. | This is the time for nitpicking. A professional team wants it perfect for you, too. |
Answers to the Questions We Hear All the Time
1. “How long will my project actually take?”
Honestly? Longer than you hope, but shorter than your worst nightmare. A bathroom might be 6-8 weeks, a major kitchen renovation 3-4 months, and a whole house project several months to a year. The key is a realistic timeline built in during planning, and a team that communicates proactively about any hiccups. Unforeseen issues happen (hello, 100-year-old plumbing!), but they shouldn’t be a surprise.
2. “Should I live in my house during the remodel?”
For smaller projects like a single bathroom, maybe. For anything involving your kitchen or major dust, we strongly recommend finding an alternative. It preserves your sanity, your family’s peace, and allows the crew to work efficiently. Think of it as a short-term investment in marital and mental health.
3. “Why can’t I just be my own general contractor?”
You can. And you can also perform your own dentistry. But should you? A true general contractor manages a symphony of trades, schedules, inspections, and problem-solving. They have the relationships and the expertise to navigate the inevitable storms. The potential savings often evaporate in delays, mistakes, and your own lost time and stress. FYI.
Wrapping This Chat Up
So, there you have it. The renovation itch doesn’t have to be a source of anxiety. It’s the start of an adventure to fall in love with your home all over again. It’s about finding partners who listen, plan with precision, and execute with care.
If you’re in the San Diego area and that itch is turning into a full-blown plan, we’d love to chat. At Golden Shore Design and Build, we live for this stuff—transforming the everyday into the exceptional, one thoughtful, well-built project at a time. Let’s grab a coffee (virtual or real) and start sketching on a napkin. Your dream space is closer than you think.
Related Articles
The Secret To A Clutter-Free Kitchen Renovation
Kitchen Remodeling
Is Your Kitchen Layout Working Against You? Here’s The Fix
People Also Ask
A galley kitchen requires a careful balance of space and function. The absolute minimum width for a functional galley kitchen is generally 7 feet (84 inches) from countertop edge to countertop edge. This allows for approximately 42 inches of clearance between the two opposing countertops, which is the standard minimum for one person to work comfortably and open appliances like the oven or dishwasher. For a more comfortable two-cook space, a width of 8 to 9 feet is recommended. For a comprehensive guide on optimizing your kitchen layout, including detailed measurements and design strategies for tight spaces, please refer to our internal article Kitchen Remodeling. Golden Shore Design and Build can help you maximize every inch of your San Diego kitchen.
To redesign a small galley kitchen, focus on maximizing vertical storage and creating an efficient work triangle. Install floor-to-ceiling cabinets to utilize every inch of wall space, and consider open shelving for easy access to daily items. Choose light colors for walls and cabinetry to make the space feel larger, and use reflective surfaces like glass backsplashes to bounce light around. Pull-out drawers and organizers are essential for keeping countertops clutter-free. For lighting, layer under-cabinet task lights with recessed ceiling fixtures. If you are in San Diego, Chula Vista, National City, La Mesa or Spring Valley CA, Golden Shore Design and Build can help you plan a layout that balances function and style for your galley kitchen.
For a narrow kitchen space, focus on maximizing vertical storage and creating an efficient workflow. Install tall cabinets that reach the ceiling to store items you rarely use, and use pull-out shelves or drawer organizers for easy access to pots and pans. A slim island on locking casters can provide extra counter space and storage while remaining mobile. Opt for a galley layout with a single row of counters to avoid a cramped feeling, and use reflective surfaces like glass backsplashes or glossy tiles to bounce light around. At Golden Shore Design and Build, we often recommend using light paint colors and under-cabinet lighting to open up the area. Consider open shelving for frequently used dishes to keep the space feeling airy and functional.
The 3x4 kitchen rule is a general guideline in kitchen design, suggesting that the primary work triangle—connecting the sink, stove, and refrigerator—should have legs totaling no more than 26 feet, with each leg ideally between 4 and 9 feet. This principle helps ensure efficient movement and workflow. For homeowners in San Diego, Chula Vista, or National City, applying this rule can prevent bottlenecks in smaller spaces. At Golden Shore Design and Build, we often adapt the 3x4 rule to fit modern layouts, especially in open-concept homes where the triangle may be adjusted for islands or multiple cooks. The key is balancing function with your specific kitchen dimensions.
A galley kitchen layout works best when designed for maximum efficiency in narrow spaces. The ideal configuration features two parallel countertops with a walkway between them, typically 36 to 48 inches wide. This creates a highly functional workflow triangle, placing the sink, stove, and refrigerator in a straight line or across from each other. To optimize this layout, install deep drawers for pots and pans, use upper cabinets that go to the ceiling, and include pull-out shelves for easy access. For expert advice on keeping your galley kitchen organized and functional, read our article The Secret To A Clutter-Free Kitchen Renovation. Golden Shore Design and Build recommends focusing on continuous countertop space and strategic appliance placement to avoid congestion.
For a long narrow galley kitchen, the primary goal is to maximize efficiency without creating a cramped feel. The ideal layout uses two parallel countertops, typically 4 to 5 feet apart, to allow for a smooth work triangle. To avoid a tunnel effect, use light colors on cabinetry and walls to reflect natural light. Strategic under-cabinet lighting is essential for task areas. Open shelving at the end of the run can visually extend the space, while a glass backsplash adds depth. For specific strategies on correcting flow issues in this layout, our internal article titled 'Is Your Kitchen Layout Working Against You? Here’s The Fix' at Is Your Kitchen Layout Working Against You? Here’s The Fix provides excellent guidance. At Golden Shore Design and Build, we often recommend vertical storage solutions to keep countertops clear and maintain an open pathway.
For a 12-foot galley kitchen layout, maximizing efficiency is key. The ideal design follows the work triangle rule, placing the sink, stove, and refrigerator in a logical flow. With this length, you can create two parallel countertops, typically 4 to 5 feet apart for comfortable movement. Consider deep drawers for pots and pans instead of lower cabinets to improve access. Upper cabinets should extend to the ceiling to eliminate dust collection. To make the space feel open, use light colors on cabinets and walls. For professional advice on reducing visual clutter, read our internal article titled The Secret To A Clutter-Free Kitchen Renovation. Golden Shore Design and Build recommends focusing on task lighting and a streamlined backsplash to enhance the galley's functionality without overwhelming the narrow footprint.
A galley kitchen can be made more functional and social by adding an island, provided there is enough width. For a standard galley layout, you need at least 8 to 10 feet of clearance to install a narrow island that does not block the main work corridor. The island should be about 24 to 30 inches deep to allow for counter space while keeping walkways open. You can use the island for a prep sink, a cooktop, or simply as additional storage with cabinets underneath. For professional guidance on maximizing your layout, Golden Shore Design and Build recommends reading our detailed article Kitchen Remodeling for specific measurements and design strategies.
A galley kitchen remodel to an open concept is a significant structural change that can dramatically improve your home's flow and natural light. This transformation typically involves removing a load-bearing wall, which requires professional engineering and permits from your local building department in San Diego, Chula Vista, National City, La Mesa, or Spring Valley. The key is to plan for a seamless transition between the kitchen and living area, often using a large island for prep space and seating. For a successful renovation, we recommend reading our internal article titled The Secret To A Clutter-Free Kitchen Renovation to master storage solutions. Golden Shore Design and Build can guide you through the structural engineering and design phases to ensure your new layout is both beautiful and safe.